Candace Robertson

One educator, determined to create an engaging and dynamic experience for learners of all ages.


1 Comment

Promoting a Culture of Play & Exploration in Adult Learning

Ok, here’s the truth:  I’ve been incubating and drafting this post for about a month now.  That’s because this is a big topic, like really big!  Thinking about culture change in any environment encompasses a lot of grounding information, growing information, energy, questioning, and above all it is challenging to communicate all of the intricacies that come into play.  Is there a succinct way to share this shift in culture without leaving something out?  Here is my attempt at it!

League of EdTechies Shield

How do we engage adult learners in our educational setting?  This is a question that I’ve been focused on for the past two years as I moved into a Technology Facilitator role.  As educators, we create dynamic educational experiences for our learners. For some reason, when we create educational experiences for our educators (professional development), we do things that we would never do in our own classrooms- WHY?! We would never use our full class period to stand in front of a PowerPoint for 2+ hours (or the dreaded full day “sit and gets”) and then send students home without any sort of formative assessment, hands-on learning activity, connection builders, etc.  So why is this acceptable for our adult learners and more importantly, how do we create a change?

Reason for Culture Change

I have always believed that learning should be FUN!  If you want to create lifelong learners, they need to experience the fun of learning at some point in their lives.  I’d argue that most of the educators who are slow to adopt technology in the classroom have probably never had fun with it in an educational setting.  Traditionally, we instruct educators how to “integrate technology” in a manner that is intimidating and is far from fun!  You’ve probably been in a PD situation where you were trying to follow someone training a large group on a new technology and a few mouse clicks were heard, cursors were flying, and somehow an hour passed when you heard the presenter say, “…and that’s it, any questions?”  That was stressful.  Did everyone notice how lost you were?  Why (or how) would you ever do that again?  What did that have to do with your classroom?  It was totally removed from the purpose.  It was about the technology, not about practice.  With taking the first step into 1:1 in our building this year, I knew that we had to have more people who were having fun with technology and we had to make it about their practice.  True, fun isn’t the only way to create a change in culture, but through play we can create a culture of learners who are explorers, risk-takers, creative, connection-makers, adaptable, flexible, innovative, and more!  If we were going to thrive and not just survive, we would need more educators with the qualities previously mentioned.  I needed to take action towards creating a culture change- I was going to bring play and fun to adult learning in our building.

Inspiration for Culture Change

Edcamp,  PLAYDATE, TeachMeets, and Twitter chats are all such fun PD experiences to be a part of.  The reason each is fun differs- some are inspirationally fun, others are hands-on fun, some inspire play, some are content and curiosity fun, but all inspire connections and applicability.  They are EMPOWERING.  Every PD should make us feel the way that we feel when we leave one of these awesome educational opportunities.  To remold adult learning in our building, we needed to capture this energy.

The First Step

The establishment of our “Instructional League of EdTechies” was to serve as our energy source for making this culture change possible.  No, no, no, this is not your standard technology committee- it is a “secret” society, adorned with code names, agent cards, badges, and most definitely some capes!

The League has two driving questions which serve as our goals:

  1. What support can we offer to teachers with integrating/infusing technology purposefully?
  2. How are we supporting CCSS, etc. with devices?


Notice that our driving questions are not just about technology, but are about it being purposefully done to support practice.  The driving questions touch on the idea of being connected learners as well.  There’s a reason that I even put the word “Instructional” into The League’s name, although it may seem repetitive to those familiar with educational technology.  I wanted to clearly define the purpose and place emphasis on practice.

League of EdTechies Agent Card

Setting the Tone for Play

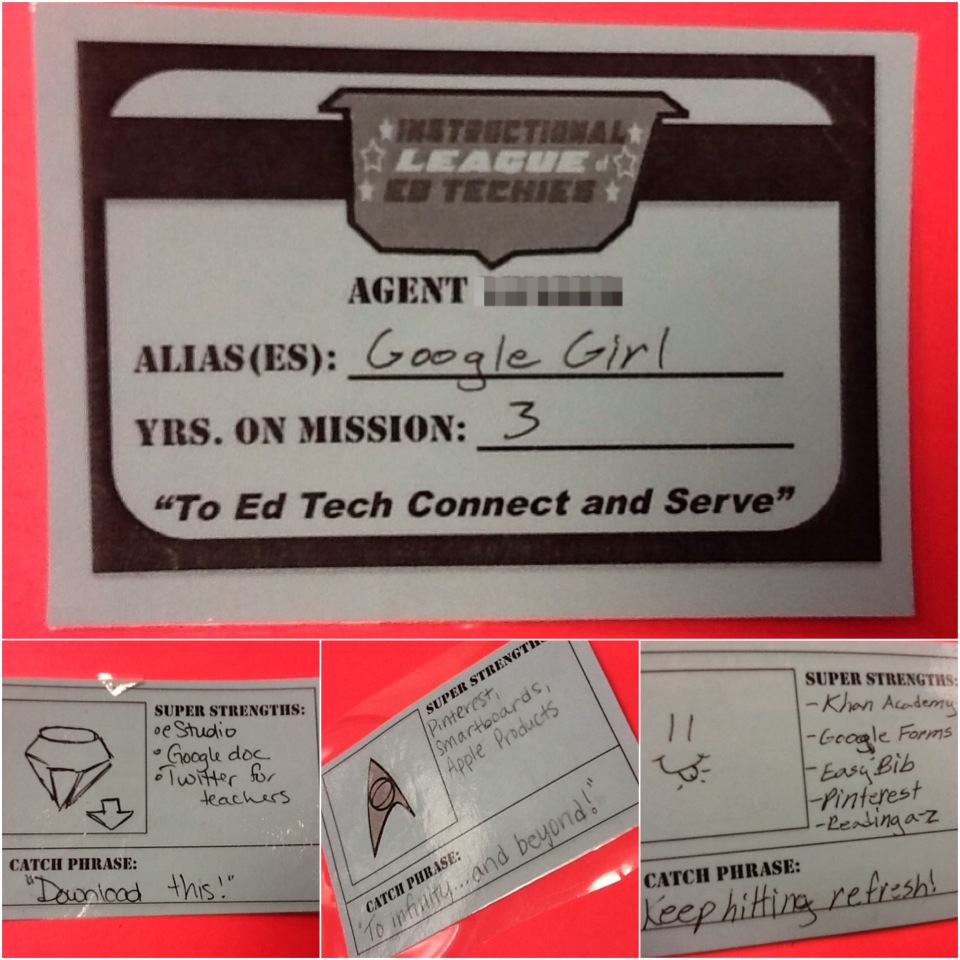
We spent the early months establishing ourselves and building the culture of our group- we needed to let go of worries or feelings of inadequacy in tech skills, each member needed to see their “super powers” because everyone has them!  Plus, if this was truly going to be the catalyst for change in adult learning, I had to make that very clear from the start.  That’s why every member received an agent identification card at the first meeting (pictured on the left).  With our identification cards in hand, we were all now a part of The League and had taken on an identity, were charged with a mission, and were aware of each other’s experiences and strengths.

Playing Together, Spreading the Spirit 

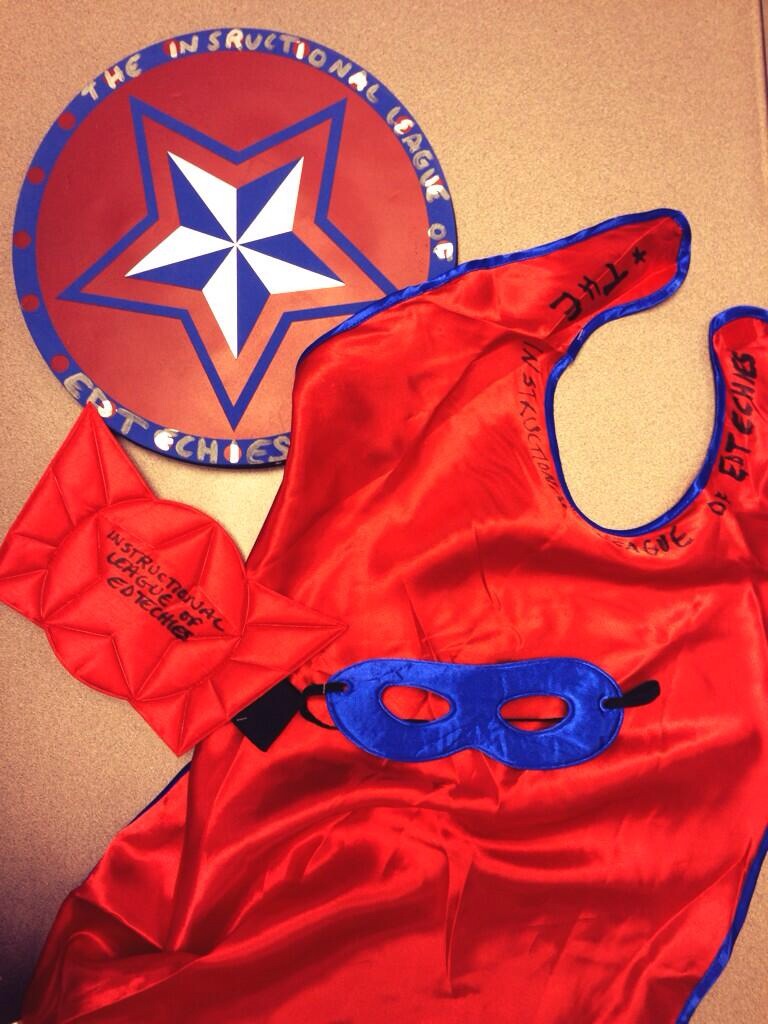
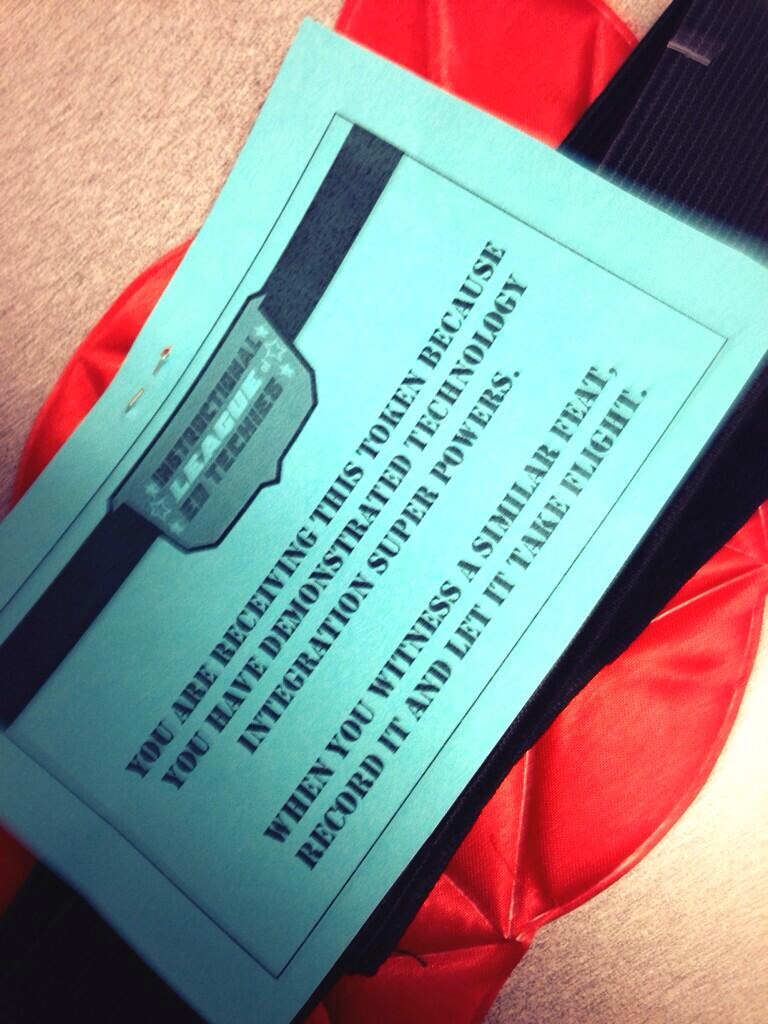
To further connections and to create conversation about educational technology, we have some “Teacher Swag” (pictured below) that we pass around the building to affirm meaningful technology integration and to create an awareness.  This super hero paraphernalia is passed to all teachers and is from all teachers, not just from The League members.  When you receive it, you can hang it in your room, wear it, have students wear it when teaching about a technology, and the list goes on.  When you are ready to hand it off, you write the name of the next recipient on the object itself and the reason for which they are being awarded this “token”.  The capes, shield, etc. were a reminder to connect with those around you and once our teachers became more connected, they noticed a lot more meaningful integration taking place so we actually had to purchase more capes as the year progressed.

Teacher Swag               Teacher Swag Card

Growth in Play and Exploration 

With 75 teachers on staff, we started the year with about 10 members in The League and grew to 22 members by March!  One of the most exciting things about The League is that we have members from every grade level and subject area (from Special Education, to Algebra, to Spanish) and we range in our comfort with technology.  Within the hour that we spend together once per month, we start our meetings with a chosen “Slam”.  From our favorite Common Core resources, to Mac user tips & tricks, to Web 2.0 tools, we start our meetings by creating energy.  We then move on to exchange ideas, tools, and brainstorm ways to meet the needs of our students (and sometimes our own needs!).  It’s about more than technology, it’s about collaboration and creativity.  The League is now taking ownership over the content and sharing their curiosities by determining what we’ll explore at our next meeting.  For example, last month a member asked if we could devote a meeting to productivity and executive functioning, so we did!  Now that we’ve grown in our comfort with trying new technologies, we don’t go over the actual technical steps of the tools we discuss because we have now set the tone for clicking and playing.  Keep in mind that this growth is just from September to April of one school year so far.

Teachers as Leaders

We have a lot of fun playing and exploring together, but each member of The League is also being provided with the opportunity of leadership and they are taking that responsibility seriously.  The questions that their teammates are now bringing me are much less about technical items and are more grounded in ideas surrounding instruction.  They are either utilizing The League members to answer their technical questions or the exploration is catching on and they are becoming more confident in doing a little research and playing to figure things out.  In February, we were provided an opportunity to lead an after school PD that lasted an hour and a half during one of our staff meetings.  There were no goals specifically defined by our administration, other than helping our colleagues prepare for the full transition to 1:1 next year.  This was our opportunity to bring play and exploration to a larger group of adult learners, in a more formal setting.  Each member of The League received a badge before this event to help and identify them publicly as an educational technology leader in our building.  The badge, which a majority of them wear daily, is just a small representation of the exceptional resource these educators are for one another!

This is only the beginning of our journey, as we continue to join forces and take our classrooms and learning community to new levels.  In fact, now that I’ve cleared mental space with this post, I owe you a post about the fun we had leading our February PD!

Creative Commons License
Promoting a Culture of Play & Exploration in Adult Learning by Candace Marcotte is licensed under a Creative Commons Attribution-NonCommercial-ShareAlike 4.0 International License.


1 Comment

MaKey Makey, Squishy Circuits, and Bigshot Cameras

With my time in Michigan State’s Educational Technology program, the “Maker Movement” has really captured my attention.  Two  years ago, I went to my first Maker Faire in Detroit, Michigan.  Since then, I’ve been to three different Maker Faires.  This idea of creating, repurposing, and innovating blows my mind when I see examples of the way Makers view common items.  Makers seem to have the perspective of life as an ever-evolving masterpiece or they see the potential to turn standard items into a contraption that measures the wavelengths in the electromagnetic spectrum (just an example, but a true story!).  As the Maker Movement is getting more attention in the educational field, this Maker spirit was re-energized within me at a recent #PLAYDATE Chicago.  Using MSU and PLAYDATE as resources, I purchased the following resources to utilize with students.

To test out what a middle school student could accomplish within a certain time period, I rolled out these resources with the Tech Club after school.  I wanted to see how to gauge a timeline for pushing into a classroom and doing an activity with any of these resources, so this was a great way to collect some data!  The students had about 45 minutes to work and I introduced it by telling them that they were the pilot members and that our goal was to think of ways we could relate this to any subject area…this is always my challenge to them!  They’ve “think tanked” awesome educational repurposes for technology in the past, so they are now owning the responsibility of figuring out educational applications of tools that don’t necessarily seem educational.  Here’s where we started:

Maker CollageStudents were eager to get started! The directions that I gave them were to use the resources they have at hand (written directions that came with product and the Internet).  I told them that I’d only help if they got into an extreme bind.

Maker Collage 2Here are the results after 45 minutes!

Maker Collage 3Here are the interesting connections that students were making to content (some more obvious than others):

  • Science: Circuits and energy conversion.  They haven’t learned about the types of kinetic energy yet, so we were able to discuss it in terms of the Bigshot Camera because it starts with mechanical energy and is transformed into electricity.
  • Science:  Importance of observations and documenting your experiments.  Students began to tape the building process for later reflection.
  • Math:  Variables, measurement, order of operations
  • ELA:  I introduced how these could compare to the writing process and students elaborated on which parts were like a rubric/prompt, brainstorming, editing, peer review, etc.
  • Social Studies:  At one point, students were building a fan with pipe cleaners and a student commented on the colors that they selected to use (red and blue).  Immediately, a student working nearby shouted, “There’s Social Studies!  What do those colors mean?!)
  • Art: Squishy Circuit students began to mold their Play-Doh® into animals to follow the directions of making LED illuminated animals.
  • Music: Makey Makey students began to create keyboards to play songs.  This calls for knowledge of notes, pitches, and rhythm.
  • Collaboration:  We saw happy hands and lots of them involved!  There were no angry or greedy hands, but true teamwork and collaboration were emerging.

…More to come after we have our next go round after Spring Break!


Leave a comment

#ICE14 Presentations

Here are the presentations that I was able to collaborate on with awesome colleagues, for the Illinois Computing Educator’s Conference recently.  These are the presentations that will be revamped for ISTE this summer!

Remix, Repurpose, Redesign: Promoting Student Ownership and Engagement

iPadeology: Staff and Student Resources for 1:1 Deployment 


Leave a comment

Using Instagram + Tumblr to Document Student Learning

When I was teaching 6th grade science in 2011-2012, I wanted to cultivate an environment which called my learners to become true scientists and document and share data (report your findings!) every day.  In addition, I wanted to bridge the school to home gap that sometimes emerges in an Inquiry-based classroom and increase parent engagement.  Let’s face it, as educators, we all have enough on our plates.  So, how could I accomplish both of these goals without creating a ton of additional work for myself?  I found the answer in student ownership and pairing technologies!

The technology tools that I had on hand every day were my personal iPod, 2 digital cameras and 4 Flip cams that I bought on sale, and my personal Macbook Pro.  Mainly, we used the iPod and Macbook for the topic that I’ll be discussing in this post.

After getting permission from administration and sending a letter home requesting parent permission to share photos and video of students, we compiled a no-photo list and displayed it near the door in our classroom.  The deal was that we (as a classroom) would never post a name and a face together and that we would never picture the face of somebody who was on the no-photo list…hands were ok!

Every day, different students were assigned the task of documenting our learning.  We typically rotated around the members of one lab group per week.  Everyone at some point had the opportunity to be our documentarian/field scientist. Students took pictures, video, and interviews during our class period.  At the end of the week, a new group of students were selected to create a video that reflected our learning. We viewed the video on the following Monday to connect student learning to the next week and posted it to our website as a sharing/reflection piece.  The awesome part about this was that it provided a connection from each of my class periods as well.  For the first time, they got to see how their peers tackled science content in another class period.  In addition, parents were engaged and could see what we were doing in our classroom every day/week.  They were physically able to peek into our classroom through our sharing on our class website.  We used Animoto and iMovie frequently to create our weekly sharing artifact.  I only taught the first two students how to use iMovie and Animoto, which meant that there was student ownership in this whole process.  Once I had my iMovie and Animoto pros, they had to teach the next set of students how to use the tools.  After the first few weeks, this was a pretty seamless process.

How did we keep up to pace on sharing daily?  When seeking a technology to use, I wanted something that could be embedded on our class website so that it was navigable and I wanted it to be simple enough for the students to use and for me to manage.  In the end, I chose to use a private Instagram account and feed it to Tumblr so that I could make it appear as a photostream, attached to my website.  At that time, Instagram hadn’t gained mass popularity yet and there was no widget to add the stream to my site which is why I utilized Tumblr for curating the photos.  As a class, we set very clear guidelines about posting images.  We agreed to meet these expectations:

  • You have to caption images with the date and text to describe the learning
  • Only Ms. Marcotte could be the person to share  the image as the final step
  • No faces of no-photo students
  • No names/faces together in an image

So, how did I manage this in a classroom with 30+ students at times?  As students documented our learning, if they wanted to share a picture from the day, they had to open Instagram and date and caption the picture. When ready, they had to get my permission and I was the only one allowed to push the final share button. This resulted in our daily photostream.  Check it out here!  There was a lot of positive feedback because by the time the students got in the car at the end of the day, the parents already knew what questions to ask and topics to talk about because they had viewed the uploaded photos. The students loved it and took ownership of it and their learning.  They wanted to talk about science when they went home!  At the end of the year, we had a reflection for almost every day of their 6th grade year in science.  That was powerful!

Q & A’s I have gotten about using these tools in the classroom:

  1. How did you present this idea to students?  I presented the idea by telling them that science is all about sharing. What would happen if all of the great scientists in the world never shared their understanding? What would we know and what would the world be like today? I told them that the iPod would rotate around lab group members each week (1 person each day). It was their job to document our learning and to share it. We agreed on the expectations for images captured and shared.
  2. What specifics did you address with parents?  I didn’t do anything specifically related to Instagram since I created a private feed and Instagram. I created a photo/video permission slip (with administrative approval) and told parents a student’s name would never be associated with their face. We had our list posted on the wall of the classroom that said who couldn’t be photographed/filmed. It was the responsibility of the documentarian to not include their face in photos/videos. It was the job of the editor to double check this for all class periods as a step in the editing process.
  3. Were you concerned about using social media with your students?  I taught science.  There were concerns every day about everything!  Hot plates + sixth graders…need I say more?  I discussed my idea with administrators and I got it approved beforehand since I was utilizing social media in the classroom.  Having a private feed and never picturing names and faces together made our classroom a safe place for documenting our learning.  Through the proper structure and roll out of the idea with students, the “scariness” of using social media lessened.  So much of the success of utilizing social media was really about our classroom culture and strengthening it through clear expectations and trust.
  4. Seriously, how much work did this take for you to accomplish this?  Seriously, it was all student created and managed.  Literally, all I did was push the share button on my iPod after reviewing the photos and then uploaded the weekly videos to Google Drive for sharing.  Just like lessening the fear of using social media, with proper structure, we were able to create a flow of roles in our classroom that allowed me to be a facilitator of the documentation and not have it be dependent on me solely.  And…it’s a classroom!  If it took extra time for editing on the following Monday, we were flexible and gave it the time it needed.  Some weeks, we didn’t watch the review videos until Tuesday or in rare cases Wednesday if there were a lot of student interviews that week.


Leave a comment

How Did We Prep for 1:1? Teacher and Student Resources Explained

As our district piloted a 1:1 resource allocation for k-5 over the past three years, this year provided the opportunity for the middle schools to officially enter the pilot!  Excited, anxious, curious, and strategizing are all words that could have summed up the summer of collaboration between myself and the other middle school Technology Facilitator in our district.  How could we best prepare our students and teachers for the fall rollout of the devices?  With lots of discussion, a shared Evernote notebook of resources and ideas, and a shared planning Google Site, it was decided that we would put together some sort of lesson start up for our teachers to guide the students through the first few weeks of school.  So…the real planning got started!

Naturally, we began “TPACKing”!

Context:

  • Every student (Grade 6 in my building, Grade 7 in the other middle school) would have an iPad to utilize as a learning resource.  Once a contract was signed, students would take the device home with them every night.  This is the first year that the middle school has been in the pilot and none of our teachers or students coming into the pilot have had an iPad experience previously.  We are starting at the foundation.  Staff had optional professional development that they could be a part of during the summer (See my iPad 201 post) and we created two iTunes University courses for staff to utilize for summer preparation as well.

Content:

  • Teachers: 21st century teaching/learning skills
  • Students:  21st century learning skills
  • Guiding Questions:  What skills/ideas are essential for students and teachers to be successful and smart users of the iPad?

We had a lot to cover!  From executive functioning, to digital citizenship, to Internet safety and everything in between!  We started with the basics of increasing the technical skills of the user through personalizing the device (organizing folders, tips and tricks of using the iPad, creating photo albums for each content area, etc.).  Then, we “leveled up” to integrating learning how to use key apps by addressing content that teachers have to address at the beginning of every school year (like dress code).  We moved on to discussing Internet safety and Creative Commons.  It was key to us to create an awareness of proper use of the device and proper use in sharing, as we knew students would be creating and sharing at a much higher level with their devices.

Pedagogy:

  • Guiding Question:  How can we model meaningful 21st century learning for students and teachers?

We knew we needed to use this as an opportunity to not only increase the digital literacy of our students, but of our teachers as well.  This challenge called for lots of modeling!  From citing sources throughout our lessons as a way to reinforce digital citizenship, to providing a clear instructional sequence to model online learning strategies, we kept an eye on details as we created the sequence of instruction.  My work with Michigan State’s Certificate in Educational Technology helped to solidify a sound and concrete structure for delivering content.  When teaching a course in Winter 2013, I fell in love with the instructional sequence:  Explore, Learn, Create, Share (Master of Arts in Educational Technology Program, Michigan State University).  After dialoguing with my colleague and discussing observations she had from a visit to Aptakisic Junior High, we also wanted to create a structure to increase engagement and differentiation.  Through the inclusion of elements of gamification, we were able to create a structure to allow students to “level up” or move on if they already had an understanding.  We wanted to be incredibly hands-on and interactive, as we knew that the only way to really increase digital literacy was for our students to interact with the device and the content.  With all of these ideas spinning around, we decided on a mix of structures that we had experienced, which took shape in the following instructional sequence of every learning opportunity:

  • iDiscover:  Content, as outlined by the learning target for the level
  • iExplore:  Learning about the content or tool in a more exploratory, hands-on way
  • iCreate:  Creating an artifact that demonstrates understanding of the content, using a technological tool
  • iOrganize:  Organizing ideas or the device itself in some way to create personalization (ie., setting up folders, photo albums, etc.).  Let’s remember, we’re working with middle schoolers.  We know how messy their lockers can get!
  • iReflect:  Provide an opportunity for students to make connections to content and extend their understanding
  • iShare:  Provide students the opportunity to share their understanding of the content

All of these pedagogical strategies allowed us to create a focus on individual exploration.  We were aware that technology had been taught through demonstrations in classrooms and we knew that, while this can be effective, it would not be plausible when allowing for student choice in demonstration of learning as the year got rolling.  In addition, we opened up every challenge to exploration and encouraged the participants to explore, play, and problem solve on their own.

Technology:

  • Guiding Questions: How can we model purposeful technology integration and use this as a learning opportunity for teachers?  How can we make the content more accessible to students through utilizing the device?

To make the content more accessible and place emphasis on the exploration and differentiation elements, we decided to utilize a Google Site to house our program, which we deemed “iSucceed”.  Affordances of using Google Sites over using our selected learning management system:

  1. Students would not have to create an account to get to the information.  So, we could start Day 1!
  2. Familiarity with the technology.  We would not distract from the content which we had identified as important by having hang ups in dealing with issues of understanding how to navigate content in the selected learning management system.
  3. Provided a shell that allowed the content to flow in an easy-to-follow sequence.
  4. Allowed for staff not in the pilot to have access to the content.
  5. Allows for fluid differentiate for all levels of users by embedding video tutorials and written directions so that content is represented in multiple ways.

Take a look at our iSucceed Program!

iSucceed Website

iSucceed Website User Interface

Reflections:

The resource allocation roll out at the middle school certainly set the tone for utilizing the device in purposeful ways.  Since we took content which needed to be covered−like the dress code—and showed how students could access content, clarify their understanding, and demonstrate their new knowledge, it allowed for teachers and students to see how content could be made accessible in new ways.  We have teams at our respected buildings and district level that are still reflecting fully on how we will better prepare for the full roll out next year.  I’ll certainly keep you updated!

References

Master of Arts in Educational Technology Program, Michigan State University.  Explore, learn, create, share [instructional sequence]. (Jan. 2013)