
Looking to provide more choice in how students demonstrate their understanding? Check out these Multiple Intelligence choice boards that provide you and your students with creative ways to show what they know! These choice boards were developed for K-8 teachers and were a part of a professional development on creativity. If you open the slides, you’ll find that grade levels for each board (or really, wheel!) are mentioned in the presenter notes section.
Tag Archives: 1:1
iPad Distribution Day
 This year, we are transitioning from a pilot year of 300 student devices to our inaugural year of full implementation with about 900 student devices. With feedback from teachers stating that they were ready to go and wanted to be able to use the device asap with students, we decided to attempt an iPad distribution day before the school year started. So, we started to put plans into place!
Some things you should know about our distribution are that we had summer employees tag, scan, and assign iPads to students. They also had the fun job of removing them from their boxes, labeling the iPad for the student, and placing the iPad in our new cases. We are using Apple’s new Mobile Device Management program this year and parents were asked throughout the summer to create an Educational Apple ID for their student(s) under 13 years old. We pair Apple’s MDM with Cisco’s Meraki MDM. Now that we have all of the technical specs out of the way, let’s take a look at the actual event details.
We scheduled one day, a week before school started, from 1pm-7pm for students to pick up their devices. Students had to have their iPad Handbook signed and hopefully had created an Apple ID before coming to the event. We decided to not split them into certain time frames by alphabetical order or ask them to schedule a time for pick up since we were doing distribution for just one day. We had 26 teachers in our building volunteer to help (our teachers rock!), in addition to about six student Tech Squad members. The helpers were arranged in shifts from 1pm-4pm and 4pm-7pm for the most part. Let me tell you, I can’t imagine doing this with any less number of helpers!
We set up the event in stations so that the tasks were separated. At each of the six stations we had a poster with the steps of the station so that individuals could start the station steps on their own while they waited in line. We also had handouts on each table with the same steps. We tried to have at least 2 helpers at each station. For some of the more challenging stations, we had three helpers.
Breakdown of Stations (You can find our complete station guides here.):
- Station 1: We initially separated individuals as they entered into two lines: 1. Have an Edu Apple ID, 2. Don’t have an Edu Apple ID yet. Then, when they had taken care of business at Station 1 with either just signing in or creating an Apple ID, they received a ticket so that they could proceed to Station 2 and pick up their iPad.
- Station 2: The red ticket was used so that Station 2 knew that the student had checked in and had turned in their signed iPad Handbook. This worked really well. Students told the helper their last name and as the helper searched for the iPad, the student found their name on a sheet of labels. Students then immediately labeled their chargers. After getting their iPad, they proceeded to Station 3.
- Station 3: Students went through the startup configuration of the iPad, until they got to the “Get Started” message and home screen.
- Station 4: Students renamed their iPads so that we could manage them by building and grade level. They also turned on items in the app store so that they could receive apps.
- Station 5: Students set up their student email and found their Meraki email so that their device could receive apps.
- Station 6: Students checked to make sure they had the Meraki profile on their device and then completed an expectation checklist so that they were aware of the big iPad rules before leaving the building.
| Issues | Successes | Lessons Learned |
|
|
|
Overall, we had more success than issues and after the first two hours of a non-stop line of people, we were easily able to get people in and out in under 20 minutes. The biggest hang up which caused for some people to be there longer was due to our issues accessing Apple’s website through parent email. When parents were clicking the “Consent” button, the webpage was redirecting them to the wrong page and was not allowing them to create an actual Educational Apple ID for their student. We ended up just forming a line where we took the parent’s information so that we could help them create an Apple ID at a later time. Being flexible and creating a plan on the go really helped! We had about 700/853 students come through to pick up their devices that evening and it was truly an awesome showing of our learning community with the number of staff, students, and parents involved!
ISTE Presentations 2014
Remix, Repurpose, and Redesign: Promoting Student Ownership and Engagement: My colleagues and I presented on strategies for remixing content and repurposing technologies, which allows educators to redesign their pedagogical strategies. Through low-tech and high-tech repurposing, students can engage in deep play, allowing them to get lost in the content…in a good way! These strategies include redesigns of every day classroom routines, like Bell Ringers, classroom rules, Exit Slips, etc. Click the image below to be taken to session resources.

iPadeology: Staff and Student Resources for iPad Deployment: My colleague and I presented on the key characteristics of the mindset that we developed to guide decision making during our first year in our district’s 1:1 pilot. We share the steps we believe made us successful, how we managed to keep the focus on instruction and not the device, student development resources, staff development resources, and parental resources for deployment. Click the image below to be taken to session resources.

Embedded Professional Development
We started the year with a clear goal in mind: our professional development (PD) revolving around technology would not be in isolation, it would be embedded and would serve as a modeling opportunity for teachers to see what meaningful technology integration looks like. We shifted away from standard technology training by carefully placing these pieces within applicable PDs that teachers already had to focus on as a part of our district’s strategic plan (curriculum, instruction, and assessment). While we did have district professional development days where we were able to embed technology integration practices into topics like formative assessment, our easiest and most-frequent vehicle for embedded PD came from taking advantage of opportunities like our staff meetings.
 Before our pilot year started, we were able to easily identify that Schoology and Notability would be two huge pieces of our year. We knew that we needed to increase the competency and understanding teachers had with these two programs before full 1:1implementation the following year. So, how did we do this without having to hold half-day PDs on how to use the technology? A few months into the school year, we had our entire building join a Schoology course that held all of the items from our staff meetings (files, links, etc.). We had the teachers take pre assessments and post assessments in Schoology if there was professional development delivered in our staff meeting that day (ex., creating valid assessments). The files, which were posted in Schoology, we then had teachers import into Notability and use their iPads for note taking just as the students would. Here’s the cool thing about that:
- We were modeling the workflow process without ever having to explain it.
- Authentic learning was taking place because the focus was not on the technology, but was instead on the purpose and experience
I remember that when we had our first really paperless meeting(which I brought some paper copies to, in order to model printing out a few for students who like to have paper copies), we had no teachers ask for it. Keep in mind that we have about 75 certified teachers and additional support staff (social workers,admin, etc.), which brings our staff meetings to about 85-90 people, all at varying levels of tech skills. Not. ONE. Asked. For. Paper. They were willing to take a risk after being given only a 2 minute overview on how to take notes inNotability. Why were they willing to take this risk?
- They immediately applied everything we showed them in that quick 2 minute intro. (We didn’t front-end-load them with all of the “Wows” of the application or give them 20 steps to remember at a later time, plus examples, etc.)
- We only told them what they needed for that moment (writing tools, zoom in to draw, create a text box, add a page, scroll, and erase). They weren’t given a laundry list of things that they didn’t have a chance to apply, so they didn’t immediately feel like they would never be able to understand the tool.
- We did turn up their anxiety a bit by having them use it right in that moment without any preparation. We made some of them uncomfortable, but did not push them too far. They did not have the time to choose to shut down because they had to authentically apply it right in that moment.
- We planted 1 teacher at each table that had experience with the applications.
- We encouraged play, exploration, and sharing at the tables. If you learn a cool trick, share it! We wanted collaborative learning.
- Collaboration made it fun!
 We continued to use Schoology to house staff meeting materials and encouraged Notability for recording information on those electronic documents throughout the year. Casually, we would insert new features of the programs (a discussion in Schoology one month, adding sticky notes into Notability for a jigsaw activity the next, etc.). Now that we had established this culture of play, exploration, and sharing, we were able to run these integration opportunities without any tutorial whatsoever.
As the year went on, we began to integrate other applications. Need to take a vote on the dress code at the staff meeting? Use Socrative. Having teachers read an article on the web about CCSS? Use Subtext and let them share their takeaways and questions as they read. Want to get staff to a web resource? Create a QR code and have them scan it. Slowly, our teachers were being exposed to the power of the tools that all of their students would have the following year.
Continuing the momentum, we introduced “App Attacks” at one of our last staff meetings. Because we were modeling so much, we wanted to make sure the connection to classroom application was concrete and was also inspiring idea generation. The term “App Attack” came from a teacher who was involved in the brainstorming of this idea. We had explained what “App Slams” and “Demo Slams” were, but were looking for a more expansive view so that we could include websites, apps, etc. and we wanted it to not be about the tool, but to be a mass brainstorming activity where the teachers shouted out what they could do with the tool. We wanted to use our collective powers to attack the tool and determine how many classroom applications we could generate…in 1 minute! So was born, the “App Attack”. After all of the staff members completed a Google Form with an image inserted in it about hallway expectations, we had a 30 second explanation of what this new “App Attack” was. Then, the timer was set, and the staff members began to shout ideas out. In one minute, we collected 16 classroom applications for using a Google Form with an image and we had more people who wanted to share, but the timer went off. Why was this strategy successful?
- The focus was on what they are already experts in: their content and their classrooms.
- It was unexpected. (Who gets to randomly yell out at staff meetings…or in life?)
- It created energy.
- It created a bit of good anxiety because staff wanted to get their ideas in before the time was up.
- It was an activity that focused on the collective knowledge of everyone in the room. One idea would spark another, and so on.
- It was fun!
Using the above-mentioned strategies for embedding PD into pre-existing meetings and professional development allowed us to create teacher buy in. We didn’t have to sell the value of what we were talking about because we created the value from the experience. We were showing, not telling and it had an impact.
How Did We Prep for 1:1? Teacher and Student Resources Explained
As our district piloted a 1:1 resource allocation for k-5 over the past three years, this year provided the opportunity for the middle schools to officially enter the pilot! Excited, anxious, curious, and strategizing are all words that could have summed up the summer of collaboration between myself and the other middle school Technology Facilitator in our district. How could we best prepare our students and teachers for the fall rollout of the devices? With lots of discussion, a shared Evernote notebook of resources and ideas, and a shared planning Google Site, it was decided that we would put together some sort of lesson start up for our teachers to guide the students through the first few weeks of school. So…the real planning got started!
Naturally, we began “TPACKing”!
Context:
- Every student (Grade 6 in my building, Grade 7 in the other middle school) would have an iPad to utilize as a learning resource. Once a contract was signed, students would take the device home with them every night. This is the first year that the middle school has been in the pilot and none of our teachers or students coming into the pilot have had an iPad experience previously. We are starting at the foundation. Staff had optional professional development that they could be a part of during the summer (See my iPad 201 post) and we created two iTunes University courses for staff to utilize for summer preparation as well.
Content:
- Teachers: 21st century teaching/learning skills
- Students: 21st century learning skills
- Guiding Questions: What skills/ideas are essential for students and teachers to be successful and smart users of the iPad?
We had a lot to cover! From executive functioning, to digital citizenship, to Internet safety and everything in between! We started with the basics of increasing the technical skills of the user through personalizing the device (organizing folders, tips and tricks of using the iPad, creating photo albums for each content area, etc.). Then, we “leveled up” to integrating learning how to use key apps by addressing content that teachers have to address at the beginning of every school year (like dress code). We moved on to discussing Internet safety and Creative Commons. It was key to us to create an awareness of proper use of the device and proper use in sharing, as we knew students would be creating and sharing at a much higher level with their devices.
Pedagogy:
- Guiding Question: How can we model meaningful 21st century learning for students and teachers?
We knew we needed to use this as an opportunity to not only increase the digital literacy of our students, but of our teachers as well. This challenge called for lots of modeling! From citing sources throughout our lessons as a way to reinforce digital citizenship, to providing a clear instructional sequence to model online learning strategies, we kept an eye on details as we created the sequence of instruction. My work with Michigan State’s Certificate in Educational Technology helped to solidify a sound and concrete structure for delivering content. When teaching a course in Winter 2013, I fell in love with the instructional sequence: Explore, Learn, Create, Share (Master of Arts in Educational Technology Program, Michigan State University). After dialoguing with my colleague and discussing observations she had from a visit to Aptakisic Junior High, we also wanted to create a structure to increase engagement and differentiation. Through the inclusion of elements of gamification, we were able to create a structure to allow students to “level up” or move on if they already had an understanding. We wanted to be incredibly hands-on and interactive, as we knew that the only way to really increase digital literacy was for our students to interact with the device and the content. With all of these ideas spinning around, we decided on a mix of structures that we had experienced, which took shape in the following instructional sequence of every learning opportunity:
- iDiscover: Content, as outlined by the learning target for the level
- iExplore: Learning about the content or tool in a more exploratory, hands-on way
- iCreate: Creating an artifact that demonstrates understanding of the content, using a technological tool
- iOrganize: Organizing ideas or the device itself in some way to create personalization (ie., setting up folders, photo albums, etc.). Let’s remember, we’re working with middle schoolers. We know how messy their lockers can get!
- iReflect: Provide an opportunity for students to make connections to content and extend their understanding
- iShare: Provide students the opportunity to share their understanding of the content
All of these pedagogical strategies allowed us to create a focus on individual exploration. We were aware that technology had been taught through demonstrations in classrooms and we knew that, while this can be effective, it would not be plausible when allowing for student choice in demonstration of learning as the year got rolling. In addition, we opened up every challenge to exploration and encouraged the participants to explore, play, and problem solve on their own.
Technology:
- Guiding Questions: How can we model purposeful technology integration and use this as a learning opportunity for teachers? How can we make the content more accessible to students through utilizing the device?
To make the content more accessible and place emphasis on the exploration and differentiation elements, we decided to utilize a Google Site to house our program, which we deemed “iSucceed”. Affordances of using Google Sites over using our selected learning management system:
- Students would not have to create an account to get to the information. So, we could start Day 1!
- Familiarity with the technology. We would not distract from the content which we had identified as important by having hang ups in dealing with issues of understanding how to navigate content in the selected learning management system.
- Provided a shell that allowed the content to flow in an easy-to-follow sequence.
- Allowed for staff not in the pilot to have access to the content.
- Allows for fluid differentiate for all levels of users by embedding video tutorials and written directions so that content is represented in multiple ways.
Take a look at our iSucceed Program!
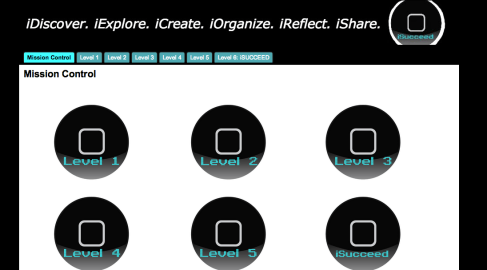
iSucceed Website User Interface
Reflections:
The resource allocation roll out at the middle school certainly set the tone for utilizing the device in purposeful ways. Since we took content which needed to be covered−like the dress code—and showed how students could access content, clarify their understanding, and demonstrate their new knowledge, it allowed for teachers and students to see how content could be made accessible in new ways. We have teams at our respected buildings and district level that are still reflecting fully on how we will better prepare for the full roll out next year. I’ll certainly keep you updated!
References
Master of Arts in Educational Technology Program, Michigan State University. Explore, learn, create, share [instructional sequence]. (Jan. 2013)
